Writing A Simple Jquery Plugin

Jquery is a fantastic Javascript library that makes manipulating the DOM a breeze. Its usefulness lies in the powerful selectors which make it easy to pick which part of the DOM you want to work with, and many functions with which to manipulate the selected objects.

Jquery provides a lot of functionality, but like any good library, also provides the ability to easily extend its capabilities. I recently found it useful to do this, so here's a quick run down on how to do just that.

The Barebones

To start with we'll just put together a bare plugin so that we can see the structure:

(function($) {
$.fn.mask = function() {
//body goes here
};
})(jQuery);

This adds a new function, mask, to the jquery object. You could use it like so:


$('#objectToMask').mask();

An Overlay

The reason I started to look into this was that I wanted to encapsulate a piece of functionality that would allow an overlay mask to be applied to an arbitrary element. This is useful when loading something asynchronously to let the user have some visual feedback.

Firstly the mask function:
(function($) {
$.fn.mask = function() {
if ($("#overlay").length == 0) {
var $overlay = $('

');
$("body").append($overlay);
}

$("#overlay").css({
opacity: 0.5,
top: this.offset().top,
left: this.offset().left,
width: this.outerWidth(),
height: this.outerHeight()
});

$("#img-load").css({
top: (this.height() / 2),
left: (this.width() / 2)
});

$("#overlay").fadeIn();
};
})(jQuery);

This is pretty straight forward; We create the overlay element if it doesn't exist, set its position along with the loading image position, and then fade it in.

The unmask function, is shorter, as it just needs to hide the element:

(function($) {
$.fn.unmask = function() {
$("#overlay").fadeOut();
};
})(jQuery);

Summary

And that's all there is to it. Extending Jquery is a relatively simple and straightforward process that's well worth investigating when you want to encapsulate a piece of functionality to make it easily reusable.

Jquery Auto-Complete with ASP .Net MVC

I've been doing a lot of work with Microsoft's MVC Framework over the past few weeks, having been a convert to the MVC way of doing things for some time.

A customer requested a feature to select an item using a popup form that would allow the user to search and select the relevant entry. I decided this could be achieved in a less obtrusive manner by using an auto-complete field a la google suggest.

Google Auto Complete

The Jquery UI library features a number of useful UI elements, with an auto-complete widget among them, so this is what I decided to use.

The MVC Controller

We'll start off implementing the backend, which will be an action in a controller that will return a JSON result.

public ActionResult Customers(string term)
{
List list = new List{
new Customer(){AccountName = "Test Company 1", AccountNum = "1234"},
new Customer(){AccountName = "Another Test 2", AccountNum = "1235"},
new Customer(){AccountName = "Another Company 3", AccountNum = "1236"},
new Customer(){AccountName = "Testing Account 4", AccountNum = "1237"},
new Customer(){AccountName = "Late Company", AccountNum = "1238"},
new Customer(){AccountName = "Test Company", AccountNum = "1239"},
};
return Json(list.Where(c => c.AccountName.Contains(term)));
}

In this case I'm just putting together a list of mock data and returning it as a JSON result using MVC's built in Json encoding functionality.

The only other thing to note here is the function argument term which contains the search term that will be entered into the auto-complete box. This is what will be used to filter our data.

Obviously in an actual implementation we'd be calling out to our data access layer to do the querying, but for the sake of example I'll be keeping this simple.

Jquery UI

Now that we have some data to work with, let's pull it down and display it. First the HTML:

And then the JavaScript:
$(document).ready(function() {
$('#customer_search').autocomplete({
source:'/POD/Customers',
minLength: 3,
select : function(event, ui){
$( "#customer_search" ).val( ui.item.AccountName );
//here we might want to store ui.item.AccountNum etc...
return false;
},
focus: function( event, ui ) {
$( "#customer_search" ).val( ui.item.AccountName );
return false;
},
}).data( "autocomplete" )._renderItem = function( ul, item ) {
return $( "

  • " )
    .data( "item.autocomplete", item )
    .append( "" + item.AccountName + " (" + item.AccountNum + ")" + "" )
    .appendTo( ul );
    };
    });

    The important things to note here:

    • Select Function: We're setting the select function to allow us to handle what happens when the user selects an item ourselves. Returning false prevents the default handler from running.
    • Focus function: As above, we're handling focus ourselves so that we can display the custom data field of our choosing. By default the 'value' property would be used.
    • Render Item: We're overriding this to give us control over how data is presented in the drop down list that is shown whilst searching. Again this allows us to display custom data fields, rather than the default 'value' field that the auto-complete field expects.

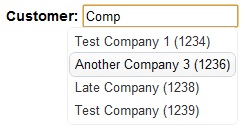
    You should end up with something like this:

    Summary

    So there we have it, a simple example of how to hook up Jquery auto-suggest to an ASP .Net MVC controller with custom data. Enjoy!